Thursday, August 30, 2012

Pretty Pins

I remember thinking at one point "Why would you need glass head pins?" I shrugged it off as some ploy to sell expensive pins to fancy people... Then I experienced plastic head pins. Can you guess why plastic is a bad idea?
They melt when run over by the iron. Which I do all the time on occasion because I'm reckless not super careful. From the looks of these pins, I'm abusive to them in more ways than one : /

 The fancy pins were making sense finally. The next problem was that I was not prepared to spend $8 for 50 pins. Yes, I'm cheap. That, and they only came in solid yellow, meh. If I'm going to get fancy pins, I at least want them to be pretty. 

So my cheapiness and cute snobbery led me to DIMS! ( do it myself ) 

I happened to have these supplies lying around for a while, so my new pins were free to me! Still, if you had to buy the supplies, they're pretty cheap. I just checked HobbyLobby.com and you can buy a box of 400 pins, A tube of beads and a tube of super glue for less than $10.

You will need:

Dressmaker pins
Big seed beads (6/0)
GEL super glue 

Dressmaker pins are slightly longer than standard straight pins. Thus giving you enough length to pin effectively even after you deduct some length with the bead.


 The beads are like seed beads on steroids. You'll be able to tell, because standard seed beads definitely will not fit over a pin shaft. 


I placed a bead on each pin, then stuck them through the edge of my ironing board. 

I put a dot of glue just below the head of each pin, then pulled the pin down, twisting as I got to the end to make sure the glue was spread all the way around the bead. You can see here why the gel glue is important. The liquid stuff would just run all over the place. 

I let the glue dry for about 30 minutes (The gel dries pretty fast.) Then I flipped the pins upside down, and added another drop of glue to the underside of the bead. Stick them back in the ironing board (this time, so the bead is not touching the fabric, unless you want it glued there forever) and leave them overnight. 

The first time I used them I did a wiggle test to make sure they were glued up nice and secure. A few needed some extra help, so I just repeated the process, and I haven't had any problems. It probably didn't help that the project I used them on was the ACU zipper pouches, where I was pinning through up to 7 layers of fabric at certain points! They do just fine for normal/light work though. I love them, because they are SO PRETTY, and they make me happy because I made good use of things I already had :) 

--CJ  


Pin It

Wednesday, August 29, 2012

Mini Toy Bag

This morning I made one of those "for a very specific purpose" crafts. My "purse" is just a big open tote bag with a bunch of smaller bags floating around inside. 

A: Pull-Ups and wipes
B: iPod
C: Thrift store funds
D: First aid 
E: Wallet
F: Ladies necessities
G: Spare shopping bag
H: phone

Along with these bags is a folder with VAT forms, an umbrella, keys, and about half a dozen random toys. I decided it was time for the toys to get a home of their own. Behold:


 Things You will need:
 
Two pieces of fabric at least 12"x12"
some ribbon/string/shoelace/drawstring like device
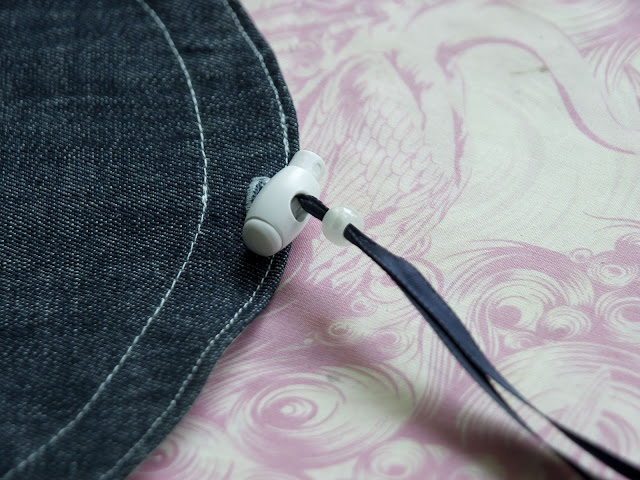
Optional: springy toggle doo-dad 


 I found the biggest circle stencil in my possession, which happens to be a dinner plate, and traced it on my fabric pieces. I wished my circle was a bit bigger, so when I cut the pieces out, I left a bit more room around the edges. 


Next I marked where I wanted the hole for the drawstring to be. (about 3/4" from the outside edge.)


 Button holes were another thing that I was deathly and needlessly afraid of, but they're easy! A lot of machines nowadays have fancy features that pretty much do everything for you. Mine doesn't, but honestly, I kind of like having a little more control over the whole process. Different fabrics move through the machine differently, so I always do a test button hole on a scrap of the fabric I'm using before I stitch on my real piece.


 Sometimes the left and right sides of the button hole get stitched tighter or looser, so you may have to adjust this guy (the zig-zaggy plus and minus thing) to get them to match up. Read your manual though, you'll probably learn a bunch of cool things your machine is capable of that you had no idea about!


Ok, once you're happy with your test hole, go ahead and stitch one onto your outer fabric piece. Use some small scissors or a seam ripper (carefully) to open up the hole. 

  Taadaa!

Now pin the your outer and lining pieces together right sides facing in, and stitch around the edge using a 1/4" allowance. Don't forget to leave on opening to turn everything right side out! OK?

So now we're turned out and pressed neatly. Time to make a drawstring casing. I used a ruler and chalk to give me a stitching guide. Stitch along your line (or if you don't need a line, about 3/4" from the outer edge) and then topstitch your outer edge (at about 1/8") 

Once everything is stitched up, use a safety pin to thread your drawstring material of choice through the casing.

Now you can attach your springy-toggle thing if you have one, or just knot your string if you don't.

I originally wanted this to be a lot larger than this, BUT then I remembered that I'm going to be toting this thing around in my purse. It holds seven cars, which is more than enough! The best part is that if you cinch the draw string just a little it turns into a bowl, so Dom can play with all of his cars on the bus without them falling all over the place! We got to test it out this afternoon, and it worked great! Yay for not chasing Hot Wheels all over the bus :)

--CJ


Pin It

Tuesday, August 28, 2012

Soldiering On...

After I officially proposed my ACU transformation project, I went from excited to overwhelmed. I don't usually plan my crafts, they  just happen when I'm bored, or I need something to serve a specific purpose. Plans are my pitfall. I've never kept a New Year's resolution (this year: washing, drying, folding and putting away laundry all on the same day. I'm pretty sure the basket of clean laundry has been awaiting folding for about four days now, and if I fold it, that buys me a few more days before I will feel the desire to put it all away. I hate laundry, more than anything.) So I took a step back for a couple days, and over the weekend I started breaking down the jacket. 

I like taking clothes apart at the seams with a seam ripper. It saves precious inches, and it's interesting to see how things are put together. After trying to muscle through some super reinforced stitching, and stabbing myself in the hand with the seam ripper, this became a cut-apart-at-the-seams project. I did still have plenty of seam ripping to do to remove the zipper and velcro, but cutting the seams saved me probably a few hours, and countless injuries. Here it is (mostly) broken down!

 I started with the back portion, since it was pretty much a flat open section, and I carefully laid out my pattern pieces. I wanted to make sure I fit as many pieces as I could with as little waste as possible, so it was like putting a puzzle together. 

 I decided to line my patterns with beige canvas, that way I could go farther with the jacket fabric.

Here's what I have so far! These are made from Michelle Patterns. Her patterns are simple and lovely. They come with really great instructions, you can finish them quickly, and they don't require a lot of materials. Pictured above are the Curvy Clutch and The Keychain Clutch.   

 The Zip Pocket Pouch is probably my favorite. I was terrified to work with zippers before I tried this pattern, and now I want to put them on everything. They make projects look more "professional" to me for some reason. 

Last but not least, the little coin purses are a life saver over here in Europe. I never carried money when we lived in America, now we live in a cash-only country where the currency involves A LOT of coinage.  Here's the pattern and tutorial, so you can make your own Coin Purse. I printed the pattern at 80%, and the inside area turned out to be about credit card sized, which is perfect for my purposes. The tutorial uses a snap closure, but I've used Velcro or snaps, and they both work fine. :) 

Now I have to start really getting creative.  I've used all of the nice flat easy pieces of this jacket, and all I have left are the crazy parts! Stay tuned, because this is going to get interesting. Hopefully in a good way! 

--CJ
Pin It

Monday, August 27, 2012

The Reveal!

...And we're back! Sorry for the long intermission! I so badly wanted to post this over the weekend, but I think, for my sanity, I should stick to my weekends off rule. I DID get a ton of other things accomplished, And I'm super excited to share them with you, BUT first comes unfinished business!

Before the big color reveal, I decided to do A little surgery. I just can't help myself. I'm really glad I did it though, because you will see what a big difference this small edit will make.

This shirt is one of those ultra lightweight numbers that I was complaining about in the Boatneck post. This fabric really doesn't take too kindly to being manhandled and ripped apart. So I had to be extra careful with my measurements and stitching. You've heard "Measure twice, cut once" ? Well, I put the shirt on, pinched how much of the sleeve I wanted taken in, I pinched how much of the sides I wanted taken in, then I marked the middle of my ribcage. I took the shirt off, turned it inside out and chalked out my marks. I took the sleeve and chest portion in 1 1/4" on both sides. When I reached my ribcage mark (which was 6" down from the armpit seam) I took a ruler and drew a straight line angling to the bottom hem. The angling lets you have a nice fit in your narrowest area, and leaves a little extra room in the lower half. Want to know why it's important? It keeps the fabric from being extra clingy on (if you're like me) your lower-tummy-post-pregnancy-bonus-skin-stash. :) OK! I drew my lines, pinned, and tried it on again. I decided it was still a good fit, got stabbed in the armpit with a straight pin, managed to get the shirt back off without losing an eye, and stitched it up! Then.... I tried it on again. Still good! That makes it "Measure FOUR times, cut once!" I cut, went over the open edges with a zigzag stitch, and voila!


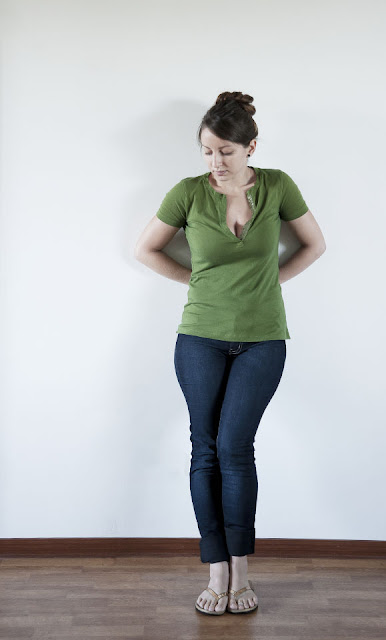
See what I mean?! Sure it fit alright at first, but now it fits like a glove. Those simple lines took this from ok, to polished. Not to mention THE COLOR! It's a much more agreeable shade of green now, don't ya think? It even matches the sequin collar detail better than before! 


It matches my second favorite coffee mug, for the win!  

--CJ 

Pin It

Friday, August 24, 2012

I think I'm going to DYE tee

While sifting through the piles of clothes at the $5 bag sale, I came across this awesome sequin collared J. Crew tee. It was bright out that day, I was hot, and there was some swamp gas reflecting the light from Venus, so I definitely didn't see a problem with this shirt until I got it home. 
It's very pukey, for lack of a better description. As you can see, I am so very mature. :) 


Don't get me wrong, Green is my favorite color, but this shirt is the worst possible shade of green for my skin tone. Working at a paint and decorating store, you learn that green can be unfair to your wonderful good looks sometimes, and it is NEVER a good choice in a room with a mirror. I imagine the same goes for wearing it directly under your face all day.  

After closer inspection,  I found funky bleachy stains all over the place. (sad face) 


The fundamentals of this shirt are lovely though, so it's still very much worth a small investment to save it. 


My "small investment" is this $3 box-o-dye. I picked teal because I wanted to cancel out the yellow-y-ness in the shirt, and it was one of two boxes of dye at the craft store. So, I had my mind made up for me! How convenient! 

   
So I carefully followed the directions, actively trying to keep this a mess-free experience, and as I spectacularly poured in the dye for your viewing pleasure, I splashed it all over the place. I got dye down my leg, on my fingers, and on two hand towels. They were old and dingy anyhow, so I just threw them in the dye to finish what I started. Now everything is in the dryer, so this will be a cliff hanger! Sorry to do that to you, but it's getting late anyhow, and my child seems to think I should cook him dinner. 

So.... TO BE CONTINUED!......
Pin It

Thursday, August 23, 2012

Big Tee to Boatneck

I hate women's t-shirts. There, I said it. They are "lightweight" a.k.a see through, they're never long enough, and when I get a size that isn't too tight around my chest, it's too loose everywhere else. So I end up wearing them too tight, and I feel sausage-esque about half the day. All was lost for me until I discovered MEN'S T-SHIRTS! They are thick enough to hide undergarments, and withstand being torn down and put back together. Try that with a "tissue" tee,  it isn't pretty. 

Speaking of not pretty, this shirt began the day like this. Good morning, fresh faced CJ! You look like an XL Boy right now. That's because this is an XL boys shirt, but not for long. 

Usually I would just take the sides of the shirt in, all the way up through the underarms and call it a day, but this shirt had HOLES! So I had to do something I've never attempted before and chopped from the top!


 It's hard to tell in the picture, but I cut right under the collar (safely removing the hole-y region) and sloped gently down the sleeves. I first did an angled cut from the shoulder to the sleeve, and I got this weird pointy shoulder thing going on. Not cool.

Turn everything inside out, and pin the sleeves from the outside edge to the point where you want your neck hole to be (I made my neck about 10" wide) and sew them up. I also took the sides in about 2 inches on each side. You can leave the collar un-hemmed to let it do that rolling thing that jersey does, or hem it... it's up to you.

Here's what it looks like all done to give a better idea of how the neck/sleeve cut was made.

And DONE! It's fitted where I want it to be, and now I can still eat an inordinate amount of lunch at Taco Bell (and I did! Says CJ from the future) without having to suck in my taco-filled gut all afternoon. WIN!

---CJ 

Pin It

Wednesday, August 22, 2012

Transformers

I didn't get much done today in the way of crafting, BUT I did start on what is going to be a big, ongoing project.

Meet my husband's retired ACUs. Periodically, things get worn out, and he takes a set out of circulation. Previously, he just added them to a bin in the basement, or thrown them out (in the case of the ACU jacket I washed with a pen in the pocket, oops!)  But not until I really started appreciating the value of materials did I think to reuse these things.
In case you have never seen them up close, they are durable fabric held together with about a mile of Velcro. There are also zippers, buttons, bungees and ties. Pretty much every means of holding two things together is employed in a set of ACUs. Which makes them AWESOME!

So, back to my project... I want to see how many different things I can make from one set, wasting as little as possible. It burns me up thinking about how some people just destroy or toss these out, when there is so much raw material there to make something new and useful. Once I'm finished, I will donate all of my little transformed items to my husband's unit. It should be challenging, but I'm excited to get going!


Pin It
Tuesday, August 21, 2012

The 22¢ Top

After a lot of TLC, the beading and stitching on this baby was finally brought back to its (almost) original glory. Taa daa! 

Though this is EXTREMELY comfortable, and I would love to lounge around the house all day (yeah right) in it, I think it deserves a better life as a glamorous shirt.

I got to chopping! I drew a line "straight" across from the top of one of the side slits to the other. Hmm.... do you see a problem here? The whole thing is super wonky.

I ended up making a few more cuts to make it symmetrical. I turned it inside out, sewed up my new sides with a straight stitch, and then a zig-zag stitch along the edge for extra security. 

I snipped the decorative hem from the amputated bottom piece, and re-attached it to my new bottom edge. After a straight stitch, a zig-zag and a nice (very careful so as not to melt the beads) pressing , I hemmed up the sleeves. 

It looks done! BUT NO! I decided the design was a bit much for the front, so I flipped it around, and cut out a new neckline. 

NEW AND IMPROVED!

Hemmed that neckline up, and then I was really done. 


Now that's business in the front, party in the back! By the way, I kind of hate myself for saying that as I am wholeheartedly against the existence of mullets, in hair form at least. 

I'm going to pat myself on the back for doing a wonderful job of modeling today, considering that it is about 85°F in my living room right now. Have you ever tried to put on leggings when you were already sweating? It's hard, and the ordeal causes more sweating. I must wipe my brow and carry on for the sake of fashion! ;) 


By the wayyyy... I calculated out my $5 bag of goodies, and each piece came out to a measly 22¢. This top is surely worth it! Score!

---CJ


Pin It