Showing posts with label top. Show all posts

Wednesday, September 26, 2012

Super Easy Leg Warmers

 I dug one of my favorite old sweaters out of the basement the other day... 
I put it on and realized that it has totally lost its appeal. The poor thing is just stretched out, pilling, scratchy, and out of style. I wouldn't even bother sending it to the thrift store. It's perfect for chopping up though! I would feel weird about cutting up a perfectly good sweater for leg warmers, but this things really has outlived its goodness. So, away we go! 


This is possibly the easiest thing ever. Plus, I needed a pair since my only favorite black leggings are capri length, and I hate hate hate wearing socks.


Turn sweater inside out. 
Cut off sleeves.
Cut sleeves so they are even. 

Fold the edge under, pin and sew. 

You're done! 

Now my legs are warm! Mission accomplished! 


On a side note, my MOPS craft debut went pretty well! 

 Here are some of my favorite ladies working on their bows :) I'm excited to do some more craft work with the group, and hopefully teach them some new tricks! 


--CJ 


Pin It

Monday, September 17, 2012

Scarf Weather

In my pre-blog days (a few weeks ago) I didn't accessorize much. On a good day I would wear shoes that matched my "outfit." It's just that accessories aren't cheap. You see, I have the problem that a lot of mothers have where, for about the first 3 years of your child's life, you feel super-guilty doing anything except bending over backwards for them. Every time I have a want, I think about how the money could be better spent on Dom. 

Then I realized that he had a much nicer wardrobe than me . 

I'm slowly getting over it.  I'm proud to say that I've bought a few pairs of jeans recently to replace the one's I've been wearing since high school. 

But accessories are still too expensive to me. I don't like spending more on the little details of an outfit than the major components! It's nuts! Scarfs are super trendy now, I like them, and they're easy and CHEAP to make! Double win!

We all have tops that are clinging around our drawers (or hanging out at the thrift store) that we love, but refuse to get rid of. They don't fit, and they're never going to fit... but but but..... 
Hi, I'm too short. 

Too revealing. 

Too much... stuff. 

The process is pretty much the same for all of these:

Chop the top. For the jersey knit tops, this is all you have to do. Since this one is cotton, there's an extra step. 

Rake your nail along the edge, to give it that frayed-fringy look. 

Taa-daa!

If you shirt isn't wide enough to wrap around your neck twice, it helps to make it look fuller by sewing it into a trapezoid shape. Like so:


My dotted line is just accentuating my trapezoid, you would only sew the sides, not the top and bottom. 


Three new scarfs for under a dollar! I can live with that :) 

---CJ 


Pin It

Friday, September 14, 2012

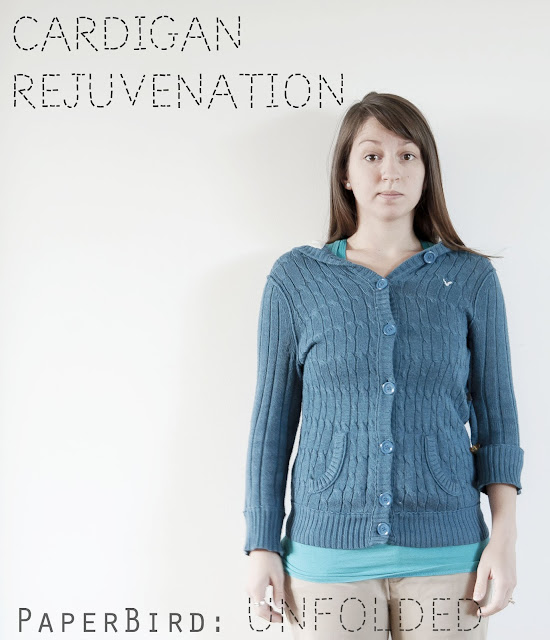
Cardigan Rejuvenation

As I mentioned yesterday, it's just about sweater season here in Germany.  This morning I pulled out my only favorite cardigan. I've had it for years. I wore it a lot during the brisk Florida "winters." Sadly, the years have not been kind to my dear cardigan. It's stretched out in weird ways, and either the sleeves shrunk or my arms got longer. 

It needs some love. You can see on the left side (my right) how saggy the shoulder has gotten from hanging on a hanger for many years, thus making the sleeve a weird length for me. It looks ok when my arms are down, but in any other position, it's in this mid-forearm-wrist area...anyway they look to short. Also, I have to point out  the very unattractive armpit crease thing going on. 

On the right side I folded up the cuff to where I think it would look good, and clipped the width of the sleeve as well. I like to give myself a visual before I get to sewing, and safety pinning with one hand is not fun. 

These guys work great. Did you ever notice on Say Yes To The Dress, when the dressed are too big, they don't pin them, they clamp them! It works! 

First, I will shorten the sleeves. With the cardi right side out, fold the cuffs up as far as you want them shortened (everything to the outside of the original cuff will be cut off, and the original cuff will stay intact) Stitch around the sleeve, over the existing cuff seam. 

After I cut off the excess from the cuffs, I turned the Cardigan inside out, then measured and pinned how much I wanted to take the sleeves in. 

I stitched them up and chopped the excess. 

Now my good 'ol cardigan looks cute and fitted, rather than baggy and sloppy!

I'm so happy I was able to extend the life of this piece! 

--CJ 


Pin It

Tuesday, September 11, 2012

Just Another DIY T-Shirt Makeover

This past weekend marked the beginning of football season. Football is, by far, my favorite sport (to watch. I don't play sports. I'm small, weak, and I have bad joints.) Anyhow, I love it so so much that I am in two fantasy football leagues, I have a closet full of jerseys, and I stay up to the wee small hours in the morning to watch it live. Yes, football starts at 7PM here. The Sunday night game ends around 5AM. I don't usually stay up for the "night" game, but this time, the coffee I drank to keep me up till 2AM did just that.... then woke me back up at 3:30.... I managed to get back to sleep at 6:45. Dom woke up at 9. 

Yesterday I was a zombie. 

Today is a new day, and I have a date with the craft store. The fun thing about having an unruly heap of thrift store clothes waiting to be revived, is I can wear something new pretty often! I just have to earn it!
What other way to get back into the swing of things than a good 'ol t-shirt makeover?! I LOVE this shirt! It appears that whoever had it before me did not love it, because it looks like it's never been worn! Yay! Now to make it fit!

I took it in 2 1/2" from the sleeves to about half way down the body, then tapered it out a little towards the bottom. 

This shirt was too long, but I didn't want to loose the stripey bottom. So I stitched two straight lines down the sides at the bottom. These are going to be a tie casing. 

I threaded some ribbon onto a needle with a big eye...

And threaded it through my casing.

Once you get to the top of the casing, pull the needle through the side seam. I needed to use pliers to pull the needle through, it was a tight squeeze. 

Now cut the ribbon of of the needle, and tie a knot. 

Now you can gather up the extra length and tie a bow...

...Or just sew the ribbon in place and cut off the excess. 

Now I have a cool new comfy tee!

Off to the craft store I go! 

---CJ 

Pin It

Wednesday, September 5, 2012

Crazy Shirt


Hi, remember this guy from the $5 bag sale yesterday?
How could you possibly forget?! It's bizarre! The situation didn't get any better when I put it on, either. 

Picasso-esque?

Hmm, this feels better...

Trace and pin and sew and......

CHOP!

Now, it's still a little bit funky. Which is good because a little is about all I can pull off. I bought one of those Victoria's Secret bras a couple years ago, ya know, the ones with the little Swarovski crystals on the strap (that cost a small fortune) I've never gotten to show them off until now :) 

I got this whole outfit for less than a buck! 57¢ to be exact. (except for the bra, of course...and the necklace) If this isn't enough to convince you to shop thriftily, I don't know what is! 

--CJ 


Pin It