Showing posts with label kids. Show all posts

Wednesday, October 3, 2012

Felt Bow Tie Pasta

My child finds mysterious ways to inspire me. Example: One of my friends needed their daughter's Halloween costume shortened, in the midst of measuring and pinning and whatnot, she left her plastic pearl necklace here. Dom found it, and has been trying to feed it to me as Spaghetti for the past few days. 

So I was thinking
I need to make more stuff with many small parts so I can go crazy trying to round them all up constantly! This kid needs play pasta! 

It's an easy one, trust me. It's exactly like making real pasta shapes, except felt is less floppy and tear-able...So it's way less frustrating.  

You will need:
1 sheet of felt (mine's antique white)
Floss or thread to match
Pinking shears (zig zag edge scissors)

First, cut 2" wide strips with pinking shears. 

Cut the strips into 2x2" squares with regular straight scissors. 

Take one square and accordion fold it, so it looks like a "W" ... or "M" depending on where you're standing.   

If you get confused, you can just check out a piece of bow tie pasta, but here's what you should be looking at. 

Thread up your needle with 1/2 thickness of the floss (3 strands) Start in the middle crease...

... thread to the outside, then back all the way through to the other side...

...and through to the middle again. 

Like this. 

Knot the two ends together, pull tight and double knot. 


Taadaa!


One sheet of felt will make 20 pieces. Which is the perfect amount for a bowl of pasta. 

--CJ


Pin It

Monday, October 1, 2012

The [Won't Fall on the Ground and Get Run Over] Stroller Blanket

I can't believe it's October already! The leaves are changing, it's starting to get cold, and today, it looks very gray and wintery. *sigh* 

On a happy note, the other day my friend/next door neighbor hooked me up with a bunch of fabric. Amongst which was this super-adorable monster print. I was instantly in love! I needed to make it into something that would get a lot of use, so I can see it all the time and be happy. It was a whole yard (which I don't usually get because fabric is pricey over here) so I could make a blanket for Dom! 

I'm pretty sure anyone who has a kid has put them in a stroller in the winter, and threw a blanket on them, because I know I would love to be chaffered around while bundled in a blanket. Then as you're trekking through the snow, suddenly your child gets claustrophobic, and Incredible Hulks their way out of their cozy bundle. Leaving your Brookstone Nap blanket mangled, wet and dirty wrapped in the tires of your stroller. Yes? 

NO MORE! 

Introducing The [Won't Fall on the ground and Get Run Over] Stroller Blanket! 
It's a simple square blanket with straps, super easy.
You need:
1 yard cotton fabric
1 yard Fleece/minky/flannel 
1 hair elastic
2 buttons
sewing machine

First things first, wash and dry your fabric. 
Press and cut the cotton fabric into a 36x36" square. 
You will have a strip left over.

Cut that strip to about 15" long (the one pictured was shorter, but if I were to do it again, longer would be better) then cut the strip in half lengthwise. 

Fold and press your two pieces in half, and stitch along the long open end. 

Press open the seams, turn them right side out, re-press, and tuck the open ends into the tube. 

Cut the metal piece off of your hair elastic, and cut the remaining piece in half. You can melt the ends with a lighter to keep them from fraying. 


Insert the elastic loops into one end of each strap. Pin in place and sew. I ended up hand sewing this part because my machine did not like going over the elastic. 

Now take your nicely cut 36x36" square of cotton fabric, and line up its selvedge edge with the selvedge edge of the fleece (minky/ flannel/ whatever you use). I do this because it is the factory straight edge. The cuts they make at the craft store are rarely ever straight.  

 See:
Use the cotton as a stencil, and cut the fleece to match it. 

Sandwich your strap pieces (elastic end inward) between the fleece and cotton (which are right side together) eight inches from the outside edge, one on each side. Pin all the way around the  blanket, and stitch, using a 1/2" allowance. Leave a 5-6 inch opening to turn the blanket right side out. 

This is what you will get! Hand sew the turning hole shut. 

Press it nice and flat (on the cotton side, fleece and minky don't like to be ironed) re-pin around the edge, and top stitch. 
I used about a 3/4" allowance. 

Sew a button to the base of each strap. You will use the strap to attach the blanket to your stroller frame so it can't get thrown off. 

If you fold the blanket in thirds, and roll it up, the straps can also be used to tie the roll together for tidy storage. 

I had to bribe him with fruit snacks to model this thing for me. Crazy kid. 

It's wide enough that it can be tucked in around his body, and there's enough room at the top that he doesn't feel like he's in a straight jacket. 

And it's just short enough that it won't hang all over his wet boots! 


--CJ 

Pin It

Thursday, September 6, 2012

A Place For My Mug

For a while I've been jonesing for a "Mug Rug." They're like little tiny quilts, and they are ADORABLE! I am not coordinated or patient enough to make a normal grown-up sized quilt...so micro-quilt was out of the question.  After accepting mug rug defeat, I decided to make a coaster of sorts. A coaster, ok... it's round, it's breakfast time, A DOUGHNUT! Of course! The best part is that if you don't need a place for your mug to hang out, this pattern can be made into a stuffed doughnut... because everyone needs one of those! 

Mmmm... Let's get started! You will need :

Felt in your cake color and your desired icing color. 
Coordinating embroidery floss (plus colors for sprinkles)
Fusible interfacing (optional)

Cut out your pattern pieces, and if you would like, apply fusible interfacing to the icing piece. It makes it hold up a little better when you embroider on it. Remember my Ironing Eco-Felt guidelines from my first post? If not, Here ya go! 

NOTE: I use Eco Felt, it is plastic, and it does melt! Be very careful when affixing the interfacing! 
•Use as low a heat setting as you can.
•Keep the iron moving.
•Steam seems to help things from getting sticky!

If it's the first time you're using this method, try it out on a scrap piece, so you can determine  good setting for your iron.  

Alright, now that it is fresh in your mind, we shall move along. 

Whenever I think of doughnuts the pink rainbow sprinkly ones come to mind. Perhaps it's my being raised in the Simpson's generation, but how can you argue that they're not the prettiest of all?! I picked 5 colors of embroidery floss (18" long each/ full thickness) and made a bunch of 1/8 to 1/4 inch stitches randomly all the way around the icing piece. 


Once you get your icing decorated as you wish, place it on top of ONE layer of the cake circles. For my coaster, I used a whipped running stitch for all of my joining stitches. For the stuffed doughnut I used a blanket stitch. The blanket stitch keeps the edges nice and secure (and flat) once it's stuffed. It takes a bit more time, but it's worth it. (Floss at half thickness [3 strands]) 

If you are ever in need of stitching inspiration, visit Sarah's Hand Embroidery. It is, hands down, the best resource for stitching instructions. 

Ok, here I have my outside stitched with a running stitch (the whipped part to come later.) Add the second cake piece to the bottom, and stitch around the hole. Make sure you catch all three layers as you make your way around. Then stitch around the outside edge of the doughnut. 

If you are making the stuffed version, I found it easier to sew about half way around the outside, add some stuffing, then stitch until it was almost closed, fill it the rest of the way, then close it off. 


There you have it. Doughnuts two ways! You can see how much of a difference stitch choice makes in a project! 


Now my mug has a happy place to sit :) 

--CJ 


Pin It

Tuesday, August 14, 2012

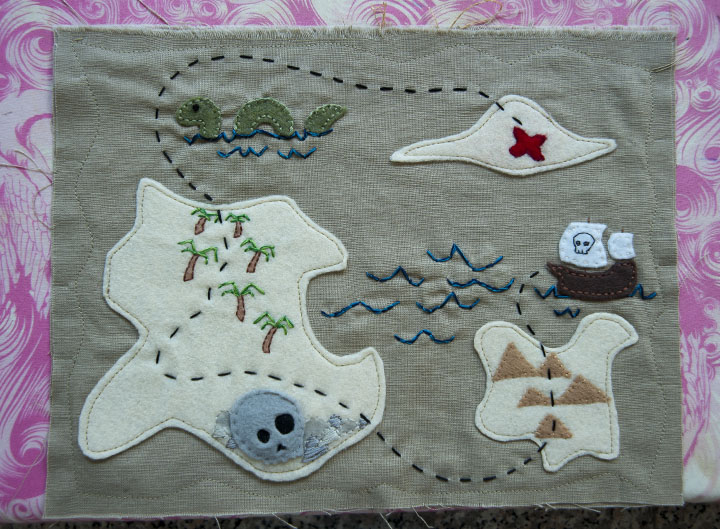
A REAL Treasure Map!

I'm excited today, because this is my first real post! I decided to go crazy, stress myself out, and kinda-sorta slap together a tutorial of sorts. Perhaps not a true tutorial, because I didn't go into close detail, but if you have a basic knowledge of embroidery and sewing, you can figure it out. Here goes nothing!

A while ago I made my son this cute little embroidered piece of loose-leaf paper (Yes I sewed LOTS of lines onto fabric) with a little "I love you." note on it. He was less than impressed with it. It didn't have wheels so... yeah, it got tossed around, every once in a while he would return it to me because he didn't want it, and so on. Just the other day he had my sweet little note rolled up. He brought it to me, looking extremely proud of himself, and enthusiastically explained that it was "A REAL treasure map!"  I was happy that he finally found some use for it, but it surely was not a treasure map. My kid NEEDED a treasure map! Challenge accepted!
The fun this about this project is that It doesn't need to be exact, or really neat for that matter. The more hand made and rustic it looks, the better. If you want a basic guide to get you started, here's my pattern. 
You can see that I deviated from my original plan a little bit. 
OK! things you will need:

•TWO pieces of fabric. I used canvas, measuring about 8.5x11. You can make whatever size you like though.

•Multiple colors of felt (this is a good felt scrap buster BTW)

•Coordinating embroidery floss and thread

•Fusible interfacing

•Iron

•Sewing machine

I like to use fusible interfacing when working with felt. It gives it a nice stability, and keeps it from stretching. So first, trace your pattern onto the interfacing(or cut out your desired shapes, if you're not using my pattern). This works well if you hold it up to a window, just make sure you're not tracing on the adhesive side. 


Next, iron your pieces into their appropriate colors of felt. 
NOTE: I use Eco Felt, it is plastic, and it does melt! Be very careful when affixing the interfacing! 
•Use as low a heat setting as you can.
•Keep the iron moving.
•Steam seems to help things from getting sticky!

If it's the first time you're using this method, try it out on a scrap piece, so you can determine  good setting for your iron.  


Ok, now that we have everything ironed on, it's time to cut out. I try not to cut all the way up to the interfacing, leaving about 2mm of exposed felt around the edge looks nicer, especially on dark pieces. 


Now to attach the decorative pieces, and embroider the details onto the islands. I used a soy crayon to fill on some of the color on the rocks and trees. 


I was originally going to hand-sew this whole thing, and you can do that if you are more patient than I am, but I was getting antsy. So under the needle it goes! Pin down the islands where you want them to a single later of fabric (the second piece comes in later), and sew around the edges. Don't worry if everything isn't even, you can always trim away a little extra felt to clean it up. Remember : "rustic"=good when it comes to treasure maps. 


Once all of the pieces are stuck on the way you want them, sew on the very easy running stitch trail! 


Now is the time to add any other embellishments you would like. I thought it needed some waves to fill in that empty space. 


Now take your second piece of fabric, and pin it to your completed map piece, right sides out. Sew a random jagged edge to attach the two pieces. 


A better view of the wonky edge. 


Then cut around the edge, about 1/4 inch form the stitch line. 


Now, to make it look really authentic, use a seam ripper to tear up the edges, being careful not to actually rip the seam!


All done! I think he likes it! 

I hope I did alright for my first time. I definitely have some more fun things to come! 

---CJ


Pin It