Monday, November 4, 2013

So, It's November...


Something crazy happened in July. I was keeping myself busy with the sole purpose of passing the time until we went back home to the US. 365 project, my advent calendar sew-along, craft meetings, kids crafts, play dates and vacations. My days were absolutely packed, and somehow I felt like I was walking waist-deep in mud. The day I've been longing for for a while was still nine months away.

On July 12th, I stood up from my computer and felt something that I haven't in a long time, but remember clear as day. A quick strained muscle running down my side. I thought, that felt just like round ligament pain. I had no other indication that my reproductive system had been up to anything, honestly, I just stocked up on lady supplies and bought a $3.99 app to track my cycle the day before. Of course, all tests came out brain-numbingly clear... I was pregnant.

My due date landed about three weeks before we were scheduled to leave Germany, making it impossible to get baby's passport in time to leave. Not that I wasn't happy---I wasn't at all prepared. This changes not just my life plans, for the foreseeable future, but everyone in my family. This took a while to come to grips with.

Of course my husband and Dom were excited about the news, and we started moving plans around to make this addition as stress free as possible for all of us.

From week six to week eleven I had a continuous cycle of eating and eating remorse accompanied with laying on the couch pitifully. Thankfully all of my food stayed down, and Dominic is old and wise enough to leave me be on the pity couch.

From week twelve to twenty (currently) I felt fabulous. Being quite short, I look pregnant rather than chubby rather quickly. I avoided driving myself crazy over everything, like I did the last time, and I embraced full-panel maternity pants and wireless bras with wide open arms. Only recently my ability to eat massive amounts of food in one sitting has been compromised. This will take some getting used to, but still, I can't complain. I'm finally feeling thumpy kicks, reminding me multiple times a day that this is FOR REAL, and soon we should find out if this small human is a boy or a girl.

Possibly the best news of all (oddly enough) is that we will be staying here in Germany until mid 2015. I really really thought I wanted to leave. It's amazing what a difference a baby makes. I'm over-the-moon excited that we're staying put. I feel like this is an answer to a question I didn't know I was asking. After spending months wondering where we would go next... "let's just stay here" feels right. I'm so thankful we were afforded the opportunity to stay. It wasn't an easy feat, and a lot of people had to work to make it work. I feel like I can breathe again.

Now that my plans aren't up in the air, I can focus on how insanely busy November will be! Hopefully crafts will be part of my crazy month, and if they are, I will certainly attempt to write about them.

Thanks for reading, and for forgiving my absence! The next few months should be exciting! Stay tuned!
*shamefully, my first intentional pregnancy picture. 20weeks 4 days*
(note: I'm not "carrying in my butt" that's just my butt. Yes, it's ridiculous, I'm aware.) 

Pin It

Monday, August 12, 2013

Felt Advent Calendar Part 3

*As i said in Part one, the assembly for little felt guys is pretty much the same thing over and over again. So here's a pattern,you can embroider it to your personal tastes!* 

Just be sure to cut out two of the main pieces (front and Back). 
I used this cookie star as my tree topper, but if you would like to just use it as an ornament, i included a smaller size. There aren't any rules when it comes to decorating a cookie, so have fun with this one! i added sequins and beads to mine :) 


Pin It

Felt Advent Calendar Sew-Along Part 2

Finally, Part 2! As i said in Part one, the assembly for little felt guys is pretty much the same thing over and over again. So here's a pattern,you can embroider it to your personal tastes! 

Just be sure to cut out two of the main pieces (horse) and the pattern pieces for detail items (saddle and mane).  


Enjoy! 


Pin It

Tuesday, July 9, 2013

Christmas In July? [Part 1 of My 25 Part, Felt Ornament Sew-Along]

Last Christmas was my first Christmas since I discovered Pinterest. Of all the unrealistic holiday crafting ideas that entered my head THIS was the king. 
Oh, yes, a harmless felt advent calendar. I think it was October when I decided to take this on. I made the tree, equipped with super strong magnets to hold my (non-existant) 25 intricately stitched ornaments, in about an hour. That is all I accomplished last year. Naked tree. 
This poor thing has been hanging around my craft area for 8 months. Last week, I made a giant leap forward and stitched around my circles. I decided that it was time to start thinking about maybe working on this again.... soon. "I'll just make an ornament a week!" No pressure, I can totally manage this. Well, I took a looksie at the calendar... I don't just need this to be done by Christmas, It needs to e done before 1 December... That leaves me with 20 1/2 weeks. Yes, friends, That's all there is between now and December. Better get my butt in gear! 

I decided this is a good way to keep me on track, and it's fun for all! Felt ornament sew-along! I'm doing all of mine with magnets, but a string or velcro can be used just as easily. This week I did an in depth, step-by-step, but the techniques will be the same, just different shapes from here on out. 

Here is a wonderful resource for embroidery stitches:

AND

A refresher on the joys of working with Eco-Felt:

^First, Print out your pattern^

You will need:

Felt
embroidery floss
 fusible interfacing
needle
magnet/velcro/thread loop hanger/buttons/whatever

Now gather your felt...
...Yes, I have a problem.


I cut out my pattern, but it would be a lot smarter to just trace the pattern onto your fusible interfacing. Brain fart, I guess. You only need one of each piece cut out of the interfacing.Adorable face is optional •_•


Iron the fusible interfacing to your felt. Parchment paper is a good idea here. Use some pressure, and only keep the iron over the piece for a few seconds at a time until the interfacing appears to be stuck. 


See, stuck. 


Double your felt piece and cut. This way you'll have perfect matches (pattern is asymmetrical), and it saves some time. Leave about a millimeter of felt around the edge of the interfacing. 


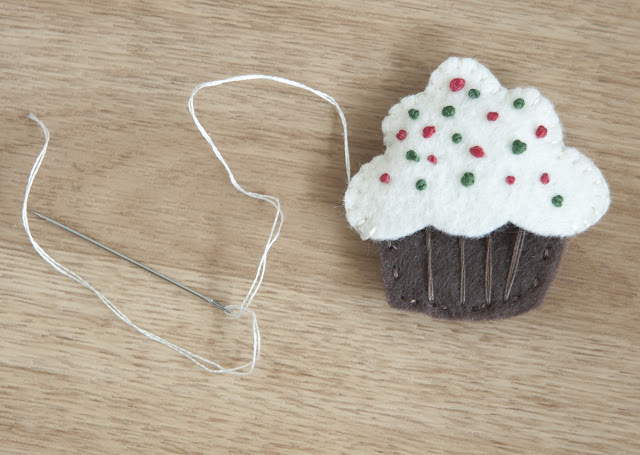
Repeat the process with the frosting. Now you can decorate your frosting piece (stitch on the side with interfacing,it has more stability and if you're using a light color of felt the thread will not show through) however you like. I decided on Christmas-y French Knot sprinkles. 


Use any stitch you like to attach the front and back pieces together. For the cake, I used a running stitch, then just added a few big lines for decoration. When starting to stitch the frosting, lay the cake piece over the top to get an idea where you will need to start and stop stitching. 


I used a blanket stitch along the top of the frosting, now I have gotten to the point where I need to stuff (i Just chop up some of the scrap felt) and insert the magnet and cake piece. 


Once everything is in place, continue stitching, but rather than going all the way through the layers, only pick up the front layer of the cake and frosting...


...Like so. Then continue this process around to the back. 


Tie off your thread, and you're done! 


Woo! One down,  24 to go!


Pin It

Friday, June 21, 2013

The Comeback

Really, I'm not sure where the past few months went. It's all been very busy, which is a magical thing, but when I got blindsided with a cold a couple days ago (during the hottest days of the year so far) I kind of had no choice but to put the brakes on a bit. My head is starting to clear today, so tomorrow I will be back to editing photos and whatnot. But right now, my sweet little neglected blog, you will get some much needed updating. 

I think we left off with my newly acquired contract to sell  crafties at the local craft store. Let me tell you, I have been blown away with the response from the community. My amigurumi plushies seem to be in high demand! It really warms my heart to know there are other people around here that appreciate cute things that really have no purpose except being cute. Those are my favorite kinds of things. ^.^

I'm also completely shocked that the views of this blog have gone through the roof since I abandoned it! I've been getting hundreds of re-pin notices from Pinterest, and I actually scrolled through the DIY&Crafts board to see Dominic's sweet little face. I was like "hey, I know that kid!" Thank you to everyone who reads and Pins! I swear I'll do my best to update here more often! 

My newest undertaking: The Washi Dress. 
I've never really used a pattern before, so I'm nervous about this one. Also, I'm having a pathetically hard time picking out a fabric for this. Like, naming your child hard. You would think this is the last item of clothing I'd wear in my life. I think I'm going to do a dry run with a cute bed sheet my friend gave me. So hopefully I can get the fear out of my system without the possibility of killing $40 worth of fabric. I will keep you updated on my progress.

That's all for now, I suppose. Maybe one of these days I'll get a chance to share some of my pictures from our Greek cruise/ week in Rome! Yes, eventually I will do that :) 

Pin It

Tuesday, April 16, 2013

What Can You Do With Two F.Q.?

A "Fat Quarter" is a half yard of fabric, cut in half to make two square-ish pieces. It's an alternative to the long skinny piece you traditionally get with a quarter yard cut. Fabric stores usually sell them pre-cut, in bundles or a-la carte. I rarely buy more than a quarter yard of fabric, because i make small things that don't require much. Yet, as I approach our last year here, I found myself wondering how much fabric I would need in the future when I can finally sell my products. I figured a F.Q. here and there is fine for me to make a thing or two for myself, but is it enough to make a line of products for sale? 

I Set out to the craft store and bought two FQ, one focus fabric, and a coordinating lining for a grand total of $5.25. I managed to make 6 items from those two squares of fabric. I was pretty impressed. 
All except two of these are Michelle Patterns. Which I am totally in love with. The bottom middle is the coin purse that I shared with you at the bottom of this post. The top right is what I managed to make with my last little (almost hopelessly small) scrap piece. 


It came out super cute, for an afterthought. 

With notions and interfacing, total cost came out around $10. Just think, for ten bucks you can organize your whole purse! I have a new found respect for the Fat Quarter, and it's going to make them even more irresistible to me... Oh no!


Pin It

Monday, April 1, 2013

For the love of it...

"...I'm singing for the love of it - have mercy on the man who sings to be adored."
-Snow Is Gone, Josh Ritter

I knew this day would come eventually. There's a bad feeling floating over my head, and I have a lump in my throat, but I'm actually a little relieved that I feel this way. I miss loving photography.

Something happened along the way that I can't quite put my finger on, but I stopped loving it. I can't even begin to express how guilty I feel saying that. I've had so many people support me wholeheartedly, and I was am good at it. Well, it ends today. 

I read an info-graphic on Pinterest that blindsided me a bit (I'm aware that having a mind-changing event over an info graphic on Pinterest is lame... that being said) Something about being a "Pro" photographer vs. an "amateur." It makes total sense to me now, but I never grasped the root word in "amateur." 

From French, from Latin amātor lover, from amāre to love.

Professional photographers scoff at being called amateur. What an insult! What I would give to revert to my amateur mindset. Looking back, my work was clever, thoughtful, and beautiful before I started trying so hard. I loved what i was doing. I took pictures of things no one normally would. I felt inspired by the littlest things. I gave a voice to overlooked aspects of everyday life. I NEED to get back to this place. 


These all came from my 365 project. As exhausting as it was, That project helped me produce some wonderful images I would never have thought about if I weren't forced outside of my comfort zone. It's obvious that I need to be forced out again. So I will be re-starting 365 in a couple weeks. To document our last year in Germany. 


Pin It

Saturday, March 9, 2013

Sun, Sickness and Selling

This week was tiring. After finally getting over the cold that Dom passed on to me last week, he came down with various...um...digestive troubles. Having a cough is one thing, a stomach bug is a whole other story. I feel so bad for him. Especially since he's been super healthy his whole life, to get hit with all of this in a short period of time must be confusing to him. Anyhow, things could be worse I suppose. We just have a TON of laundry to wash now (yayy laundry.)

Here's last week's picture: Week 9
Am I proud to be using Instagrams as my "One creative picture of the week"? No, but it's this or nothing. I love this. Even though it's like, woah, you got a lot of wrinkles going on there! 

Week 10 is all about Sunshine!
We finally seem to be emerging from winter here in Germany. From what I read, "the darkest winter in recent history." We got a lot more pretty snow than last year, but it was extremely long, and once the snow melted.... depressing. Needless to say, We have spent our days this week trying to soak up some magical sun!

Probably the most exciting development in my crafty world is that our local craft store is taking consignments. I can actually sell some of my stuff now! It's hard sometimes, making crafts and buying supplies just to make things for yourself. It's really satisfying to feel like you're crafting for a purpose. These are my first offerings, six little coin purses. I love them, and I use mine all the time (Euros are very coiny.) 
Here's to hoping other people like them too! :) 

Link to the coin purse pattern at the bottom of THIS POST.

Pin It

Friday, March 1, 2013

A Place To Rest My Legs

I know I said "tomorrow" a week ago, but here we are, seven days later. Finally my WIP is finished and ready for unveiling!

My apologies to anyone who doesn't like feet, but it IS a foot rest, and I thought this dude's cute baby feet are way more acceptable than mine. 

I'm very short, and I have bad knees. I recently realized that since my feet rarely comfortably reach the floor while I'm sitting on grown-up sized furniture, I sit 'indian style'... a lot. I have no doubts that it is not the best position for my already angry joints. I need a place to rest my little 'ol legs! 

 In my little world, knitted ottomans have been popping up everywhere. After coming across one at a store here for 80euro, I was like "Challenge Accepted! I'm making one for cheap!"

They are super easy to make. Time consuming, sure, but not difficult in the least. 

You will need:

about 600 yards of super bulky yarn
size 15 knitting needles
a men's medium t-shirt
Some sort of stuffing (Blankets, towels, poly-fil, take your pick)
Sewing machine
  

There are tutorials for these around the internet:

 http://www.pickles.no/puff-daddy-knitted-stool/

My one problem with this tut is the filling. I don't have duvets just lying around to stuff random things with. Here's my unique bit of genius:
A men's t-shirt. It's not pretty, but it works like a charm to cover up whatever ugly old stuff you have laying around, or pick up from the thrift store, to fill this thing. I just turned it inside out, sewed the arm holes shut with the sewing machine, and turned it right side out again. No need to cut the excess sleeve material off. 

I took a piece of yarn, ran it through the bottom hem like it was a casing, and tied it up super tight. There's an opening still, so I stuffed in a piece of fabric that was larger than the hole to keep everything inside. 

I filled it through the neck hole, (I used poly-fil because my friend gave me a ton of it for free, i used A LOT [ approx. 9lbs ] so it probably isn't the best option if you have to buy it, for the sake of cheapness) Once it is nice and full, use the collar of the shirt as a casing, and cinch it shut. You will have weird pointy corners from the shoulders, so just squish them into the center and stitch them in place. It really doesn't matter if it's pretty. 

Now you have your form. Feel free to use it as a foot rest while you're knitting the cover. 


To knit the cover:
CO 40
knit every row, slipping the first stitch of each row 
until the piece is about 5o" long. 

I ended up with 164 rows. Periodically hold your knitting up to your form to check how large you need it. Depending on how full your shirt is, it could take more or less length. 
TIP: When you need to add a new skein of yarn, start it on an edge. the finished piece gets kind of stretched out, and a change/woven in ends would be very obvious in the middle of a row. 

Once you reach your length, cast off, and join the two short ends together. I use this method. 

When you slip the first stitch in each row, you get a little bump. I stitched through each bump, then cinched the long ends closed as tight as possible. Place your form inside the cover, and repeat on other end. 

You will have a small opening, like on the t-shirt. I stuffed another fabric scrap in there to make the hole look neater. 

There you go! My living room has a happy new addition! 

Dom totally thinks it's a toy :p


MY Total cost:
3 skeins of yarn = 15 euro
men's thrifted t-shirt = 50¢
Poly-fil = FREE
Can't beat that! 

Pin It