A lot happened over the weekend! Well, A lot for me anyhow.
Friday morning, bright and early, my husband participated in the Army Substance Abuse Program (ASAP) Honey Badger Challenge.
Educate yourself about the honey badger:
*WARNING STRONG LANGUAGE*
(in case you're offended by stuff like that)
So he ran this cool obstacle course, annddd I didn't get any great pictures because trying to keep a 3 year old in tow with a bunch of slip&slides that he isn't allowed to play on all around... was... tough. A challenge unto me as well.
After that, errands were ran, and we got back home in time to jump on a bus to go paint ceramics. Dom made a messy coaster that I somehow managed to keep him from making into a splotchy brown mess. I'm excited to see how it comes out.
AFTER THAT, we went to the fall carnival at the local elementary school. Where I spent the entire time on various lines to purchase food.
Long bus ride home, night night.
Saturday I spent the whole day with a headache, cleaned the house, and was gifted some super-awesome fabric from my neighbor!
Sunday: Football. So, up until about 3AM.
Woke up this morning at 9.
Am I tired? Sure, but I feel like I haven't done anything over the past few days... craft-related. So I think I might go on a crafty tear today.
My neighbor has the most incredible decorations for Halloween that I have ever seen. I have...nothing. : / So I HAD TO make something to bring the festiveness to our place. Pumpkins are the easy answer. What's better than regular pumpkins? Cute teensie tiny baby pumpkins, of course! Pumpkins made of felt, that will never rot into a stinky puddle of mush on your doorstep! Ew, right?!
Awwwwwwww.
You will need:
A sheet of felt (to make 4 pumpkins, an 8x3 piece if you want to make one)
Embroidery floss (a piece at least 18" long per pumpkin)
Poly Fill
Glue
A stick (or other stem-like device)
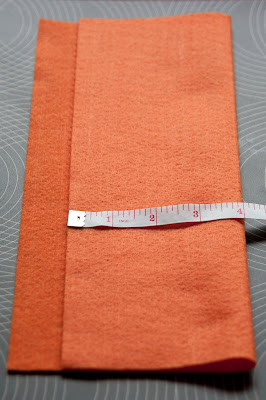
Fold your felt piece (along the long edge) so that the folded portion measures 4". Trim off the excess, and sew along the open edge. I used the sewing machine for this. Measure and mark four, three inch sections on your felt tube. Cut along the lines.
Take one of the pieces, and turn it right side out.
Starting at the seam edge, running stitch all the way around the circle. Use small, even stitches.
Pull the thread tight, like a drawstring, and knot off the end. Without cutting your thread, pull the needle through the center hole of your gathers.
On the second side, running stitch the edge like the first side, but make alternating long-short-long stitches.
You can see a little better what I mean here. Once you get all the way around, fill with poly fill, pull it tight, and knot.
Still without cutting the thread, start making loops from the top hole to the bottom hole. These will be the creases in the pumpkin.
Go all the way around. The number of loops you will make depends on how many large stitches you made while gathering the top portion. mine had eight. Once you make all of your creases, knot off the end.
You will have to fluff and shape it up a bit. I use my needle to pull out the dents in the top so they look smooth.
For the stem, snap off a 1-1.5 inch piece of twig, luckily I had one lying around the house that Dom dragged in the other day, put a drop of glue in the top hole...
...and stick and twist your stem stick on in there.
All done! Aren't they cute? I think they would make great place card holders for Thanksgiving dinner or a fall wedding!
--CJ


No comments:
Post a Comment