Monday, August 20, 2012

Thrifty Business

First off, I've officially blogged a whole week! I don't plan on posting on weekends, at least as of right now, because that's when we have family time (ie. lying on the couch watching Netflix.) I'm happy that I made it over my first of many humps though!

Today was our thrift store's summer clearance $5 bag sale. Everything you can cram in a brown bag was yours for five bucks! I've never experienced such a sale before, since I'm new to the thrifting world, and it was pretty fun! Especially for me because I re-use a lot of pieces for fabric, that means wrong size and minor imperfections aren't really deal breakers.
Now that's one cram-ified brown bag!


 Pile-o-Mystery!

Needless to say, this $5 will give me endless hours of entertainment, and many many blog posts for all of the world to enjoy! ;) 

Here's a peek at my favorite find. It needs a bit of tedious beading repair, so that's what I'll be doing this afternoon! You will see more of this guy tomorrow! 

Now I'm going to try to not melt to my sofa. It's super hot here, and Germany doesn't believe in AC. : / I'm thinking iced coffee time! 

--CJ

Pin It

Friday, August 17, 2012

These are a few of my favorite things...

No time to make things today! It's my husband's birthday, (HAPPY BIRTHDAY BABE!) and there are things (non-sewing things) to be done! Since I have some time before I need to be out and about, I thought it would be fun to share some of my favorite things.

I've recently been awakened to how wasteful and materialistic people are nowadays. We want things. Things for no real reason. Sometimes the reason is because someone else has that thing, or we want to be cooler than that guy with that thing by having this thing. It's silly. My question is: How many things do you have that you actually love?


I picked a few things today that make me exceptionally happy. Little things that are special because they're the only ones. You can't say that very often anymore!


 This guy was my my first successful felt creation. I don't remember what possessed me to make a felt banana, his stitches are all big and uneven, but he's cool. He's lived on my desk for about 4 years now.


This was a gift form my sister. She hand-painted this cigar box with my favorite sea life. Most notably, the little tunneling fish at the bottom that we saw at the aquarium. We liked it so much because it looks exactly like one of our parakeets. Totally random! Now I use this box to hold my treasures, like my expansive collection of squished pennies, and my favorite picture of me and my grandparents.


Needle threader Narwhal is a newcomer to the group. I made him a couple weeks ago after being inspired by Mollie Johanson at Wildolive. http://wildolive.blogspot.de/2012/07/project-diy-needle-threader.html
Her bobbin was super cute, but why wouldn't you want a narwhal to thread your needle if given the option?!

Last is a snook necklace made from an original drawing of mine. It's probably the thing that will last the longest, she's pretty solid!

Well I just got a call that I have to leave earlier than planned! So I hope you enjoyed my doodads, and I hope you think about, and appreciate the things that YOU have that are yours alone!

---CJ

Pin It

Thursday, August 16, 2012

Scrunchy Top!

 This is pretty much what I ended up making yesterday, but due to my 'spaziness' the tutorial didn't happen. But alas! Today is a new day, and I have this lovely thrifted Express men's shirt waiting to be fixed up for my mom!
 Alright, nerd. This is the kind of photo awkwardness that I was talking about. : /

This shirt is really very simple, and it only takes a little while to make. Especially if you don't have a 3 year old that needs your attention for *VERY IMPORTANT* matters approximately every 15 minutes. (reassembling Legos, changing the channel, making rotini pasta at 10am...etc.)
First, (since everything is already washed, ironed and laid out completely flat ) we make a nice straight line from armpit to armpit. Then cut along aforementioned line. 


 Bam! You're done! Here you see my very stylish new top. Kidding! I'm kidding. I have plans for those sleeves, but that's another day.


The next step involves math... boooo! I don't like math, and math doesn't like me, but this is for a cute shirt, so an exception must be made. 

Step 1:  Measure around your chest (just under your armpits) 

Step 2: Take that number and divide it by 2

Step 3: Add 4. 

That's it! Whew! I did my calculations and my resulting number was 20. So I measured and marked my 20 inches (making sure the 10" mark was lined up with a button, so it's nice and even.) Since this is a stripey shirt, I just cut straight down a stripe. If you do not have the luxury of built in straight edges, you will have to take an extra moment to draw a nice straight line yourself, then cut!


Now to sew the placket closed. Use thread and stitch length that matched the existing stitching, and very carefully sew over the existing stitches. You're not going to want to skip this step, once you add the elastic, this will get all gap-y and not cute. I Do only sew down about half way, so the bottom button can still open, but it's all a matter of preference.

Now, while the front and back are still separate pieces, press and sew the top hem. I prefer 1/4" for this. I like to do this before I attach the front and back, because it's easier to make a nice hem when you can lay everything out flat.


Since I do not have a serger, but I still want a nice finished inside seam, I do a French seam.  It sounds fancy, but it's simple.

Step 1: Pin your front and back pieces together RIGHT SIDES OUT. I know this goes against your instinct, but it will be ok!

Step2: Sew down the sides, pretty close to the edge (I use the edge of the presser foot as a guide for 1/4")


Step 3: Trim the edges down a bit.


Step4: Press the seams open.


Step5: Turn the shirt wrong side out, and admire that crisp clean edge!


Step 6: Sew the sides again (now on the wrong side) about 1/4" allowance. Don't go too close to the edge, or the raw edge will peek through on the outside seam of the shirt.  This is what your inner seam will look like. The yucky edge is totally hidden!

Now for the fun part. I introduce to you: ELASTIC THREAD! This stuff changed my life. It gives you the ability to make things fitted and cute with minimal effort. The hardest part is hand-winding the bobbin. Make sure to not stretch the thread while winding it. Also, you will have to loosen the tension on your bobbin case. The first time there's a little trial and error, but once you get it figured out for your particular machine it's easy. 


Using a thread color that matches your fabric in your top spool, and your elastic thread in the bottom bobbin, start sewing along the top of the shirt, just under the hem. Start your stitches, and backstitch a few times to make sure the elastic won't come undone. I started just to the right of the placket, and finished just to the left of it.

Once you have the top gathered to your liking (I did two rows of elastic, pretty close to one another) put the shirt on, and determine where you want your waist gathering to be. This will be different for everyone, depending on your...um... boob size. I was making this for my mom, and hers are bigger than mine, so I left a little more room than I would have for myself.

Measure from the top-middle of the shirt down and make a mark, then do the same thing at each side seam, and again down the middle of the back. Use a ruler to connect your four marks. This is the line you will follow for your first row of elastic.


For the second and third lines, I use the edge of the presser foot as a spacing guide. (I did 3 rows of elastic, but you can make as may as you like.)


Taa daa!  Scrunchy-ness!


The fun part is when you steam over your shirt to set the elastic, it shrinks! (steam on the thread side, not the elastic side. It will melt if you're not careful!)

Now you can wear your shirt like this, or if you're like me and bras are not optional, you can add straps!

I used the pieces that I cut from the sides of the shirt to make the straps. The thickness is up to you, but make sure that the pieces are at least 16" long, or get a roundabout measurement from one of your bra straps. Having these be a little bit too long is better than having them be a little too short. 

Fold the pieces in half, press and stitch along the open end. Then turn them right-side-out.


Lay the straps so that the seam is in the center, and press.

Strap placement is a matter of personal preference. What I usually do is wear the bra that I would most likely be wearing with this top, and mark where the bra straps line up on the shirt. That way my straps do the maximum amount of bra strap coverage! You can trim the length to whatever feels best, the 16" was just to make sure you had enough to work with.

That's it! What's cool about this is you can wear it with the buttons in the front or back, depending on your mood.  Oh-so versatile ;)

 Here I am looking fabulous in shoes that I LOVE, but sadly can not walk in. At least they're getting some use as a photo prop! (I almost fell on my face walking from the camera to the spot I was standing in the picture)

 I hope Mom will like her new scrunchy top!


---CJ


Pin It

Wednesday, August 15, 2012

The "Plan D" Top

Look at me, all smug. 

This was this morning. The day was new, I was up before my son, and I had BIG plans for this $2 thrifted J.Crew men's shirt. 

Let's just say, some things happened, I got a little too ambitious, and this thing was on the fast track to being chopped down into a change purse. Luckily (?) this was not my first fail. So I had a plan. I also had a plan when that plan got scrapped... It just wasn't my (sewing) day.  

You will, perhaps, be relieved to hear that it is still a shirt. Just not the one I set out to make, and I can live with that. 


It's cute. I have made multiple others like it. (My ditch effort was to leave at least enough fabric to make this) SO all's well that ends well. I had every intention to make a tutorial, but it would have been super confusing with all of the plan changing! It's still on my list of things to do. 


...Along with being less awkward in front of the camera : P


Pin It

Tuesday, August 14, 2012

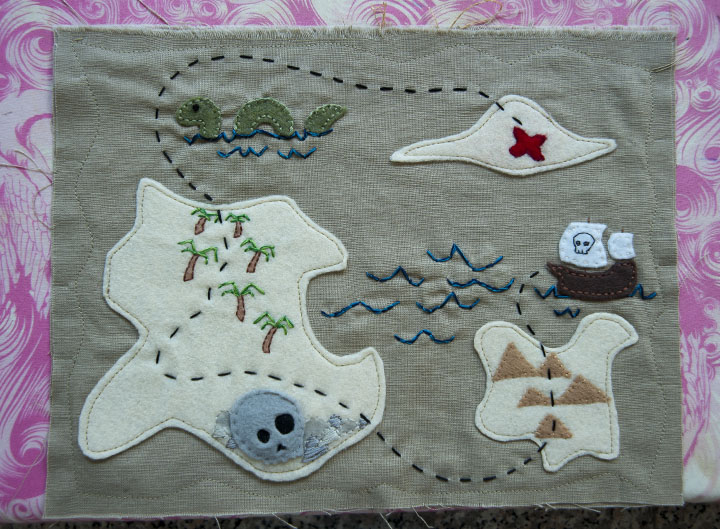
A REAL Treasure Map!

I'm excited today, because this is my first real post! I decided to go crazy, stress myself out, and kinda-sorta slap together a tutorial of sorts. Perhaps not a true tutorial, because I didn't go into close detail, but if you have a basic knowledge of embroidery and sewing, you can figure it out. Here goes nothing!

A while ago I made my son this cute little embroidered piece of loose-leaf paper (Yes I sewed LOTS of lines onto fabric) with a little "I love you." note on it. He was less than impressed with it. It didn't have wheels so... yeah, it got tossed around, every once in a while he would return it to me because he didn't want it, and so on. Just the other day he had my sweet little note rolled up. He brought it to me, looking extremely proud of himself, and enthusiastically explained that it was "A REAL treasure map!"  I was happy that he finally found some use for it, but it surely was not a treasure map. My kid NEEDED a treasure map! Challenge accepted!
The fun this about this project is that It doesn't need to be exact, or really neat for that matter. The more hand made and rustic it looks, the better. If you want a basic guide to get you started, here's my pattern. 
You can see that I deviated from my original plan a little bit. 
OK! things you will need:

•TWO pieces of fabric. I used canvas, measuring about 8.5x11. You can make whatever size you like though.

•Multiple colors of felt (this is a good felt scrap buster BTW)

•Coordinating embroidery floss and thread

•Fusible interfacing

•Iron

•Sewing machine

I like to use fusible interfacing when working with felt. It gives it a nice stability, and keeps it from stretching. So first, trace your pattern onto the interfacing(or cut out your desired shapes, if you're not using my pattern). This works well if you hold it up to a window, just make sure you're not tracing on the adhesive side. 


Next, iron your pieces into their appropriate colors of felt. 
NOTE: I use Eco Felt, it is plastic, and it does melt! Be very careful when affixing the interfacing! 
•Use as low a heat setting as you can.
•Keep the iron moving.
•Steam seems to help things from getting sticky!

If it's the first time you're using this method, try it out on a scrap piece, so you can determine  good setting for your iron.  


Ok, now that we have everything ironed on, it's time to cut out. I try not to cut all the way up to the interfacing, leaving about 2mm of exposed felt around the edge looks nicer, especially on dark pieces. 


Now to attach the decorative pieces, and embroider the details onto the islands. I used a soy crayon to fill on some of the color on the rocks and trees. 


I was originally going to hand-sew this whole thing, and you can do that if you are more patient than I am, but I was getting antsy. So under the needle it goes! Pin down the islands where you want them to a single later of fabric (the second piece comes in later), and sew around the edges. Don't worry if everything isn't even, you can always trim away a little extra felt to clean it up. Remember : "rustic"=good when it comes to treasure maps. 


Once all of the pieces are stuck on the way you want them, sew on the very easy running stitch trail! 


Now is the time to add any other embellishments you would like. I thought it needed some waves to fill in that empty space. 


Now take your second piece of fabric, and pin it to your completed map piece, right sides out. Sew a random jagged edge to attach the two pieces. 


A better view of the wonky edge. 


Then cut around the edge, about 1/4 inch form the stitch line. 


Now, to make it look really authentic, use a seam ripper to tear up the edges, being careful not to actually rip the seam!


All done! I think he likes it! 

I hope I did alright for my first time. I definitely have some more fun things to come! 

---CJ


Pin It

Monday, August 13, 2012

The Beginning! 

Now to write something that I won't look back on and be ashamed of... um... Ok, so I'm going to cop out and use the words of Jason Mraz, because it's fitting, and I promise to put more effort in from now on.    


"A beginner’s mind is a brilliant place to come from. After all, beginners are granted permission to fail. In that sense, it’s not uncommon for beginners to have more fun.

I have the word beginner tattooed in cursive on my right arm. I almost wish it were tattooed across my face so I could remember to breathe when I feel like I don’t have it all together. Oh yea, I’m a beginner at writing 4th albums. I’m a beginner at intimate relationships!

I didn’t start surfing until I was 28. It was with a beginner’s mind that I excelled, not taking flopping around in the water as a sign of weakness. Instead, all that flopping made me more buoyant and a much better surfer.

I didn’t start playing guitar until I was 18. During those awkward college years I could’ve quit as other boys my age already had bands and tight jams. I knew as a beginner I had permission to suck and that eventually I’d rock. And now I do.

So remember this. We are all beginners. We haven’t done this before. You haven’t been you on this day before. I haven’t been someone’s solid rock before. I haven’t been me at 33 before. Each day is new and we’re all allowed to fall down as often as we need to. It is through these mistakes and fumbles that we’ll likely get it right next time."


The first time I read this it was exactly what I needed to hear at that moment, and I revisit it whenever I feel overwhelmed. Alright, we shall begin again tomorrow. 
Pin It